|
Aluminum Flood Barriers - Application Tips
Flood Barrier Considerations
The best way to
prepare for flood mitigation is with an effective plan.
Mistakes and oversights can be very costly in terms of physical
damage and dollars. Flood barriers are specifically designed and
engineered to fit an individual opening. With flood barriers,
there is no such ting as a standard issue as everything is a
retrofit! Flood gates and barriers have to take into consideration
anticipated flood heights, flow rates, impact from submerged
objects as well as application issues relating to what type of
construction we must attach to.
What to Consider
-
Must read :
FEMA
Technical Bulletin 3-93 (it is on this website)
-
Establish a Deployment Plan acceptable
to your insurance company and FEMA
-
Add Sump Pumps at
strategic locations.
-
Evaluate and use
our Flood Resistant Glazing System.
-
Verify precise
Flood Plain Elevation to avoid misunderstandings.
-
Understand that
flood protection extends 12 inches above the BFE.
-
Consider
accumulative effects of water cascading down the building.
-
Heavy rainfalls
may add to water levels inside the Flood Panel line.
-
When using the
Flood Resistant Glazing System, Consult Savannah for
precise application info, mullion spacing’s, flood water
protection
THEREFORE
A PLAN - A
STRATEGY - AN ARRANGEMENT - A TACTIC - A SCHEME - AN APPROACH - A
LINE OF ATTACK - A PREPARATION - A PLOT - A MAP - A PLAN
| Number
1 - |
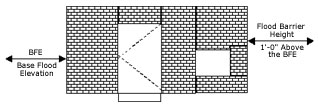
Establish
how high the barriers need to be. If legislated by the NFIP and
FEMA, it must be One Foot above the established Base Flood
Elevation for the given site. If this is not within an
established flood plane or is a Private Residence which
falls outside the NFIP/FEMA requirements, then you decide
how high the barrier is to be. |
|

|
| Number
2 - |
Evaluate
what the flood barriers are attaching to. Keep in mind that Flood barriers are
rigid rectangular panels that need a flush and even surface
on a minimum of three surfaces to attach to. (It may not
necessarily required at the top or head of the barrier as in
many cases the required height of the barrier often falls
below the actual height of the window and door opening)
Flood panels cannot walk stairs or attach to uneven
gradients or substrates. |
| Number
3 - |
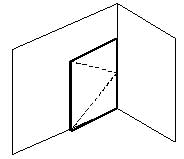
Decide on
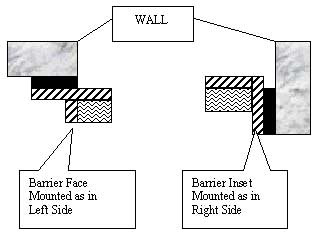
which application best applies for each of your openings. There are two options for attaching our barrier
to a structure. Our frame, a compression type set, will
either be mounted on the face of a wall plane (face mount)
or inside a window or door cavity (inset mount).
Combinations can also be used for any given barrier as well.
For example, if a door jamb is right up against an
intersecting wall say on the right side of the door, it is
possible to have a face mounted installation on the left
side with an inset mount on the right side with the sill
also being either a standard sill or face mount in the case
of an impeding stoop or concrete step. |
|
EXAMPLE:

Elevation View
|
|

Plan View
|
| Number
4 - |
Provide
detailed information for each opening along with accurate
field measurements for pricing and engineering. Include any plans, specifications,
photos (digital ones accepted too) and allow us the courtesy
of some time to define and price your project. Once we've
performed our analysis, we shall provide you with a
qualified bid notating specific quantities sizes along with
any other pertinent information. If all is acceptable and
you give us notice to proceed we will then begin engineering
the job and provide for structural engineering calculations
and shop drawings. When completed, a submittal set shall be
forwarded to you for final approval. |
| Number
5 - |
Prepare
perimeter of window and door openings to receive flood
barriers.
Although we integrate a compression seal with a dense closed
cell neoprene, all mortar joints between brick and block as
well as tile joints need to be flushed up. This too would
apply to stucco finishes as well. Important to note too, is
that all sills need to be concrete. Asphalt and surface
toppings such as cool deck, chattahoochee and pavers are not
acceptable as a surface base. Plans for concrete or cement
should be made in advance. |
| Number
6 - |
Follow our
plans for installation. Once you've completed your final review and
acceptance of the shop drawings with any corrections or
other edits noted, we will begin to fabricate your order. At
this juncture, nothing should change to significantly alter
the intended openings that the barriers are being fabricated
for. Thus, the shop drawings become your final assembly
detail or map. By adhering to these simple rules, you can
avoid certain pitfalls and provide for a smooth process.
From the information and back up we supply, your architect
or engineer will have enough to endorse a "Floodproofing
Certificate" from our involvement. Regular rules of
course apply to the Floodproofing of Non-Residential
Structures as referenced in FEMA 102/ May 1986. |

Phone (561) 656-2556
Fax (561) 656-2599
Toll-Free (888) 640-0850
E-Mail:
Click Here
|